Standard practice after installing any Cumulative Updates, Patches or Updates on your SharePoint 2013 On-Premise server is to run PSConfig to update your databases and SharePoint settings using this command:
psconfig.exe -cmd upgrade -inplace b2b –wait –force
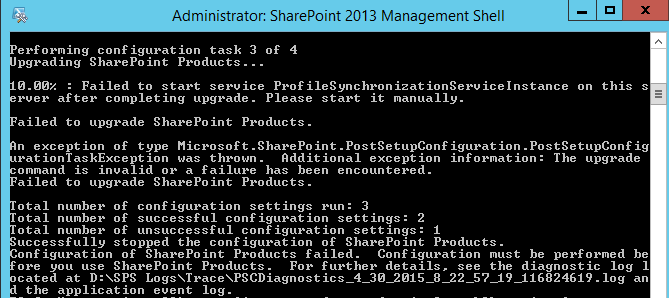
Today, I ran into a problem where the upgrade was failing with this message:

Performing configuration task 3 of 4
Upgrading SharePoint Products…
10.00% : Failed to start service ProfileSynchronizationServiceInstance on this server after completing upgrade. Please start it manually.
Failed to upgrade SharePoint Products.
An exception of type Microsoft.SharePoint.PostSetupConfiguration.PostSetupConfigurationTaskException was thrown. Additional exception information: The upgrade command is invalid or a failure has been encountered.Failed to upgrade SharePoint Products.
The below fix also seems to work for this exception when performing the upgrade:
An exception of type Microsoft.SharePoint.Administration.SPUpdatedConcurrencyException was thrown. Additional exception information: An update conflict has occurred, and you must re-try this action. The object SPUpgradeSession Name=Upgrade-20150430-120012-971 was updated by TCIspinstall, in the PSCONFIG (8776) process, on machine <machine>. View the tracing log for more information about the conflict.
To fix this, set each server in the farm to indicate that there is no upgrade running, than clear the configuration cache on each server
Summary of the fix that worked for me (c/o this post on the forums) was:
- On each server before running below steps, run from SP management shell:
- stsadm -o setproperty -pn command-line-upgrade-running -pv No
- Stop the “SharePoint Timer” service (net stop sptimerv4)
- Delete ONLY the xml files from C:ProgramDataMicrosoftSharePointConfig4f26fc4c-c716-41ca-8b83-5e1a36e0a65e
- Note: Do NOT delete the cache.ini file in this folder
- Edit cache.ini and change to “1”
- Start “SharePoint 2013 Timer” service (net start sptimerv4)
- Run psconfig again: PSConfig.exe -cmd upgrade -inplace b2b -wait –force
After performing this, it allowed me to successfully run the command.
Advanced Step by Step resolution:
To resolve this issue, clear the file system cache on all servers in the server farm on which the SharePoint Services Timer service is running. To do this, follow these steps:
- On each server before running below steps, run from SP management shell:
- stsadm -o setproperty -pn command-line-upgrade-running -pv No
- Stop the Timer service. To do this, follow these steps:
- Click Start, point to Administrative Tools, and then click Services.
- Right-click SharePoint Services Timer, and then click Stop.
- Close the Services console.
- On the computer that is running SharePoint and on which the Central Administration site is hosted, click Start, click Run, type explorer, and then press ENTER.
- In Windows Explorer, locate and then double-click the following folder:
- The Drive placeholder specifies the letter of the drive on which Windows is installed. By default, Windows is installed on drive C.
- The GUID placeholder specifies the GUID folder.
- The Application Data folder may be hidden. To view the hidden folder, follow these steps:
- On the Tools menu, click Folder Options.
- Click the View tab.
- In the Advanced settings list, click Show hidden files and folders under Hidden files and folders, and then click OK.
- In Windows Server, the configuration cache is in the following location:
- Back up the Cache.ini file.
- Delete all the XML configuration files in the GUID folder. Do this so that you can verify that the GUID folder is replaced by new XML configuration files when the cache is rebuilt.
Note When you empty the configuration cache in the GUID folder, make sure that you do not delete the GUID folder and the Cache.ini file that is located in the GUID folder. - Double-click the Cache.ini file.
- On the Edit menu, click Select All.
- On the Edit menu, click Delete.
- Type 1, and then click Save on the File menu.
- On the File menu, click Exit.
- Start the Timer service. To do this, follow these steps:
- Click Start, point to Administrative Tools, and then click Services.
- Right-click SharePoint Services Timer, and then click Start.
- Close the Services console.
- Make sure that the Cache.ini file has been updated. For example it should no longer be 1 if the cache has been updated.
- Click Start, point to Programs, point to Administrative Tools, and then click SharePoint Central Administration.
- Click theTimer job status under system.
- In the list of timer jobs, verify that the status of the Config Refresh entry is Succeeded.
- On the File menu, click Close.
Drive:Documents and SettingsAll UsersApplication DataMicrosoftSharePointConfigGUID
Notes
Drive:ProgramDataMicrosoftSharePointConfigGUID
Note The file system cache is re-created after you perform this procedure. Make sure that you perform this procedure on all servers in the server farm.
Thanks for your post. Its really helped me a lot. I could able to fix my issue
Great post! I was having the same issue and beating my head against my desk for a solid day trying to figure it out before coming across this article. Thank you!